Herbal Healing, Skin, Wounds & First Aid, Women's & Men's Health

Understanding Cellulite

What it is, how it forms, and natural ways to reduce it

What Cellulite Really Is

Cellulite is not a special kind of fat, and it is not a buildup of toxins. It is ordinary fat pressing up against the connective tissue that anchors the skin to the deeper layers of the body. The result is the familiar dimpled, “orange peel” texture most often seen on the thighs, hips, and buttocks.

Just beneath the skin lies a layer of fat divided into compartments by fibrous bands called septae. These bands run from the underside of the skin down to the muscle, much like the buttons on a tufted mattress. When the fat cells within these compartments enlarge, they bulge upward while the bands hold the skin down. The uneven surface we call cellulite is simply the visible outline of that structure.

How Cellulite Forms

Several factors work together to create cellulite, and understanding them helps explain why it is so common and why it responds best to a combination of approaches.

  • Structure: In women, the septae run vertically, so fat pushes straight up between them. In men, the bands crisscross in a mesh-like pattern that holds fat down more firmly. This is the main reason cellulite affects an estimated 80 to 90 percent of women after puberty, but relatively few men.
  • Hormones: Estrogen encourages fat storage in the thighs, hips, and buttocks and influences the tone of the small blood vessels in those areas. This is why cellulite typically first appears at puberty and may change with pregnancy and menopause.
  • Circulation and lymph flow: When microcirculation becomes sluggish and fluid is not cleared efficiently by the lymphatic system, the tissue becomes congested. Fluid retention makes the bulging more pronounced.
  • Aging skin: Over time, collagen production declines and the skin becomes thinner and less firm. The underlying irregularities then show through more easily.
  • Lifestyle and genetics: Family history, weight gain, inactivity, smoking, and a diet high in sugar (which damages collagen through a process called glycation) all contribute.

Natural Ways to Reduce Cellulite

It is important to be honest at the outset: no method, natural or medical, removes cellulite completely, because it is rooted in the basic architecture of the tissue. What can be done is to soften its appearance noticeably. Consistency matters more than any single remedy, and the best results come from addressing muscle tone, connective tissue, circulation, and fluid balance together.

Exercise and Weight

Strength training is likely the single most effective step. Building and toning the muscles of the legs and glutes firms the foundation beneath the fat, which makes the surface look smoother. Walking, cycling, and other movement also improve circulation and lymph flow in the lower body.

Maintaining a steady, healthy weight helps as well. Losing excess fat can reduce cellulite for many people, but rapid weight loss may leave the skin looser and actually make dimpling more visible. Slow and steady is the better path.

Supporting Collagen and Connective Tissue

  • Collagen peptides: In a controlled clinical trial, women who took bioactive collagen peptides daily (about 2.5 grams) for six months showed measurable improvement in cellulite and skin density compared with placebo.
  • Gotu kola (Centella asiatica): This is the most studied herb for cellulite. It supports connective tissue and collagen formation and improves microcirculation. It may be taken internally or used in topical preparations.
  • Diet: A diet low in sugar and rich in colorful, antioxidant-rich fruits and vegetables helps protect collagen from damage. Adequate protein supplies the building blocks for connective tissue repair.

Improving Circulation and Lymph Flow

  • Venous-toning herbs: Horse chestnut, butcher’s broom, and ginkgo strengthen the small blood vessels and help reduce fluid congestion in the tissues.
  • Lymphatic herbs: Cleavers and red root are traditional lymph movers that fit naturally into a cellulite-reduction program.
  • Dry brushing and massage: Brushing the skin toward the heart, along with massage, stimulates lymph flow and circulation. The effect is largely temporary but builds with regular use.
  • Contrast showers: Alternating warm and cool water over the legs encourages circulation and firms the tissue.
  • Hydration: Drinking plenty of water supports healthy tissue and helps the body clear fluid rather than retain it.

Topical Support

Creams containing caffeine or green tea can produce a mild, short-term tightening effect by temporarily drawing fluid from the tissue. Topical gotu kola preparations may offer additional connective-tissue support. These work best as a complement to the internal and lifestyle measures above rather than on their own.

Other Helpful Habits

Avoiding smoking is essential, since it constricts blood vessels and accelerates collagen breakdown. Getting up and moving regularly throughout the day, rather than sitting for long periods, helps keep circulation and lymph flowing in the legs.

Setting Realistic Expectations

A realistic goal is visible improvement over three to six months. The most effective approach combines strength training, collagen and connective-tissue support, circulatory and lymphatic herbs, and regular dry brushing or massage. Cellulite is a normal feature of the female body rather than a sign of poor health, and caring for the tissue from the inside out brings benefits that go well beyond appearance.

Herbal Healing, Skin, Wounds & First Aid

Stopping the Itch Naturally

Lots of itching is going on this summer.  Ant bites, poison ivy, you name it the cause dose not really matter, the itch is awful.  Here is the quickest way I have found to clear the itch and knock out the inflammation.

All you need is Hot and Cold water to initially stop the itch.  I have found the shower with a handheld shower head works the best.  Something about the moving water over the affected area.  Adjust the water to as hot as possible without scalding yourself.  This will pull the fresh blood into the area and it really scratches that itch without wrecking the skin.  After a minute or so of hot water change to completely cold, do this quickly, now blast the area with the cold driving the blood deep through the affected area.  This will allow the toxins causing the inflammation to be cleared by the body and flushed out of the system. 

Doing 7 “hots” and 7 “Colds” changes, seems to be the best.  A minute or so with the hot and a minute or so with the cold. The itch will be gone.  Repeat this as needed to relieve the itch if it returns. For me the relief has lasted for hours. Hydrotherapy

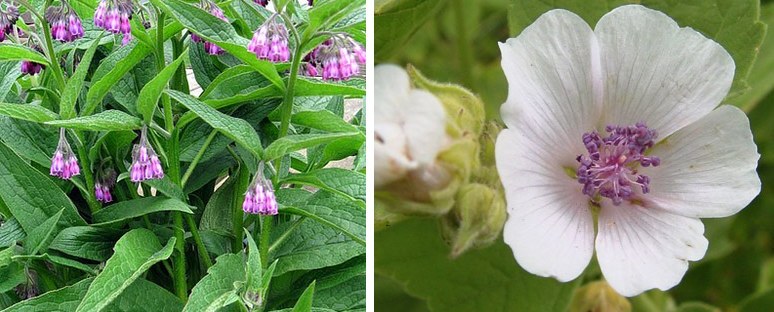
After the hot and cold, hydrotherapy, I like to apply a nice Herbal salve to support the body in clearing the reason for the itch.  A good Healing Salve herbal combination to try is, Comfrey Root; Marshmallow Root, Marigold Herb, Beeswax; Essential oil of Rosemary, Lavender, Frankincense and Helichrysum. 

When the issue is persistent or severe, a liver flush may be helpful.  The liver being the vacuum of the body can be supported in its work of clearing the cause of the itch.  The ELF is often helpful when supporting the body to clear most issues affecting the skin such as eczema or hives just to name a few. Herbal wisdom has found any issue that affects the skin can often be helped by clearing the liver.  How to do an ELF

When the liver, the body’s vacuum bag is full, the liver decides to vicariously detox through the skin.  The organ, which is the skin, is unable to handle the serious toxic waste thrown out by the liver and quickly breaks down.  Clearing the liver will encourage it to detox the waste out through the proper channels (The bowels), saving the skin from this detoxing duty nature never intended it to do.

Simple but effective natural supports should not be underrated or ignored.  The longer the body is allowed to push this toxic waste from the liver out through the skin the more difficult it will be to redirect the body and liver to stop abusing the skin.  It will have become the “normal” after years of skin issues.  As with anything in life change of habit takes time and effort.  Clear these issues quickly by supporting the liver with regular detoxing programs.

Herbal Healing, Skin, Wounds & First Aid

Clearing Tumors, Cysts, & Warts, Naturally

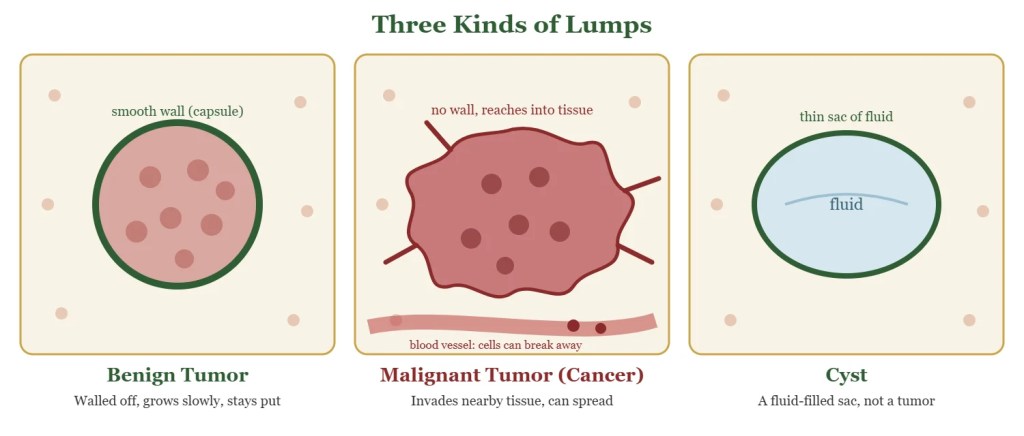
There are few things in life that bring us to attention quicker than finding a lump or bump under our skin.  One day you feel nothing, the next there is a lump.  The doctor confirms that yes you have a lump.  He cannot tell you exactly what you are dealing with until he does further tests.  One of these will likely be a needle biopsy.  Most natural healers will caution anyone considering a biopsy for several reasons. 

First: The Body has locked the toxic material away in a nice little sack. If this is a malignant growth poking a whole into the bag allowing the toxic waste to mix with the blood is a very bad idea. 

Second: There is the danger of infection and uncontrolled bleeding.  No matter what the doctor says, a biopsy is a dangerous procedure which has taken many a life, before the diseased condition was even diagnosed. 

With all this in mind today I want to provide some great Natural Healing Material which has been used successfully in conjunction with the Incurables Program to clear tumors & cancer from all parts of the body

When doing any strong healing program it is important to ensure the bowels are open and working well, while supporting the Liver and Kidneys in their role of detoxing the waste from the body. The Incurables Program will establish the foundational support for the Liver Flushing and Kidney Flushing needed to clear these issues from the system.

Potassium Deficiency is the Cause

When cysts or tumors grow in places where they can be seen outside the body, often we react by having them cut out. This defeats healing by working on the effect instead of the cause. You can cut cysts out, tumors off, and burn warts off (which are also a potassium deficiency), or get rid of as many moles as you wish, but unless you go to the cause, they will grow back again, and you may end up with as many or more cysts, tumors, moles as before. Different signs of potassium deficiency will keep popping out on the body because the condition that needs correcting is on the inside. You have to go into the cause, Dr. Christopher always insisted, which is the way we have been eating.

CYSTS, TUMORS

Hundreds of women have wondered why they have tumors and cysts in their bodies. The cause, according to Dr. Christopher, is POTASSIUM DEFICIENCY. When a patient takes plenty of potassium FOODS (not supplements) you can remove the cause of the cysts and tumors. Other foods, which are lower in potassium, must not be increased when you are trying to increase the potassium in the system. When patients go on the three-day cleanse and mucusless diet and take the female corrective formulas, they receive nourishment which is high in potassium. Miraculous things happen to them.

For even faster results, you can add to each cup of herb tea six to ten drops of Elderberry Tincture or six to ten drops of Black Walnut Tincture, both of which are extremely high in potassium.

Cysts and tumors are like leeches, but they stay in places where there is a body deficiency. As soon as the body is balanced and well, the cysts and tumors have to go, because the material is too healthy for them to live on.

This is why so many patients brought Dr. Christopher cysts and tumors in various sizes that they had expelled from their bodies. There is not enough food, in the form of dying or deficient body materials, so they just decide to leave.

You can make your own potassium broth by simmering equal parts of red potatoes, celery, carrots, onions, and herbs to taste. Raw vegetable and fruit juices also flood the system with potassium.

Potassium Broth Recipe:

This is a great-tasting addition to your cleansing program. It will flush your system of toxins, poisons and unwanted salts and acids while giving you a concentrated amount of vitamins and minerals.

Fill a large pot with:
25% *potato peelings,
25% *carrot peelings and whole chopped beets,
25% chopped onions including 50 cloves of garlic,
25% celery and dark greens.
Add hot peppers to taste.
Add enough distilled water to cover vegetables

Simmer on very low temperature for 1-2 hours. Strain, or just dip your mug in, and
drink only the broth.

Put the vegetables in your compost. Make enough for two days, refrigerating the leftover
broth. It is important to use Organic vegetables. We do not want to consume any toxic
insecticides, pesticides or inorganic chemical fertilizers while we are on a cleansing and
detoxification program.

  • If you have no use for a large amount of peeled potatoes or carrots you can use the entire vegetable instead of just the peeling. Use 25% potatoes & 25% carrots unpeeled & chopped.
Herbal Healing, Skin, Wounds & First Aid

Coconut Oil vs. Olive Oil for Skin Care

We are always looking for better ways to aid our members with the best herbal supports available. Here is some great information on Coconut Oil and Olive Oil. It would appear that our Black Walnut Salve would be more effective if we produced it with the Coconut oil.

I will post the article here as anytime I link to an article that has such great information it will, of course, disappear leaving a bad link and the loss of some great material.

Olive oil has been used since ancient times as a moisturizer for skin and hair. These days, however, coconut oil has been getting all the beauty world and wellness buzz. From haircare to lip balm to coconut pulling – a dental health trend where you swish oil in your mouth for anywhere from 5 to 20 minutes – coconut oil seems like it can do it all.

But which is better for skin care? While they both deliver a boost of moisture and a smooth, silky sheen, there are some key differences between these two hydrating natural oils. We’ll compare the two here. The Credit for this research and article goes to: https://www.oliveoil.com/coconut-vs-olive-oil-skin-care/

Benefits of Coconut Oil vs. Olive Oil for Skin Care

Is it moisturizing?

Coconut Oil

Rich and lush, coconut oil is a natural moisturizer. It makes skin feel soft, supple, and smooth, and gives off a light, glowy sheen.

That said, there are two types of moisturizers: occlusives and humectants. Oils, including both coconut oil and olive oil, are occlusives.

Occlusives coat the skin and keep moisture inside so that it doesn’t evaporate.

Humectants attract moisture from the environment or the ingredients in the product itself and draw it into the skin. Two humectants commonly used in skin care products are hyaluronic acid and glycerin.

Coconut oil also contains high amounts of linoleic acid. This is an unsaturated omega-6 fatty acid that acts as an emollient and can also boast some anti-aging benefits, too. An emollient soothes the skin, leaving it feeling silky-smooth and supple.

Olive Oil

As olive oil is also an occlusive, applying olive oil to the skin feels rich and moisturizing. In addition to giving skin a moisturized feeling, olive oil contains fatty acids that help dry skin, including oleic acid, palmitic acid, and linoleic acids.

Olive oil is also an emollient, so skin feels smooth and moisturized.

The Verdict

Both coconut oil and olive oil are occlusive moisturizers, which means they do a good job sealing moisture in. They’re also emollients, so they soothe and smooth the skin for a lush, moisturized feel. However, they don’t draw moisture into the skin.

To make either oil a more well-rounded moisturizer, combine it with another product that contains a humectant.

Is it antimicrobial?

Coconut Oil

Some studies have found that the medium-chain fatty acids found in virgin coconut oil have impressive antimicrobial properties. These fatty acids, which are a form of saturated fat, make up 65% of the total composition of virgin coconut oil. Lauric acid, which makes up 49%, is particularly effective at killing harmful microorganisms and bacteria.

One interesting study compared the effectiveness of olive oil and coconut oil on individuals with atopic dermatitis (also known as eczema) caused by Staphylococcus aureus bacteria on the skin. In the end, only 5% of subjects using coconut oil were still positive, compared to 50% using olive oil.

As such, coconut oil can be used on skin infections caused by bacteria or fungi, like athlete’s foot, folliculitis, and acne.

Olive Oil

EVOO also has some antimicrobial properties. (Read more about the bioactive compounds in olive oil here.) The main polyphenol compounds found in extra virgin olive oil include oleuropein, hydroxytyrosol, and oleocanthal, which possess anti-inflammatory, antioxidant, and antimicrobial properties.

Some research shows that olive oil can help kill the bacteria that causes acne to form, though more studies are needed, as this sample size was rather small.

The Verdict

Thanks to the power of lauric acid, one of the medium-chain fatty acids in coconut oil, coconut oil has impressive antimicrobial and anti-fungal properties. It can be used for athlete’s foot and other mild skin maladies. Extra virgin olive oil also contains polyphenol compounds that are shown to be antimicrobial, though these are less effective at killing microorganisms than coconut oil.

When it comes to antimicrobial and antibacterial properties in skin care, however, these are often aimed at fighting acne. Acne requires bacteria to grow. While coconut oil has more antibacterial properties, it is also quite heavy, which means it can cause a breakout.

As cosmetic chemist Ee Ting Ng told Byrdie, “The fatty acids prevalent in olive oil—and all plant oils and butters in general—are the very food source for acne-causing bacteria and yeasts to grow.” As such plant oils may not be the best choice for those with acne.

Olive oil can also cause a breakout on acneic skin, but it is lighter than coconut oil so it could have better results. We suggest doing a spot check on your chin line or another more hidden spot before you apply either oil to your whole face.

Does it have antioxidants?

Coconut Oil

Antioxidants help with oxidative stress, a process that can produce free radicals. These are potentially dangerous chemicals that can damage cells and could lead to the development of cancer, in the worst cases.

Coconut oil does contain antioxidants, but not to the extent of EVOO. As Dr. Qi Sun, an associate professor of medicine at Harvard Medical School told the New York Times, “While it’s true that extra-virgin coconut oil, like extra-virgin olive oil, contains phytochemicals, most of the coconut oil on the market is refined and provides few of those antioxidants.”

EVOO, on the other hand, is not refined, so it retains an impressive amount of antioxidants.

Olive Oil

The benefits of olive oil’s powerful antioxidants might work to protect the skin similar to how the cooking oil works to protect heart health and help with cholesterol. The antioxidants, especially the omega-3s and vitamins A and K, found in olive oil might work to prevent premature aging when applied topically.

And there’s more: some intriguing research suggests that applying olive oil after sun exposure could protect against cells that cause cancer.

In this study, researchers applied olive oil to the skin of mice that had been exposed to potentially dangerous UV rays. The mice with olive oil had significantly less tumor growth than the mice that did not have olive oil on the skin. More studies are needed on the effects on human skin, but it is an exciting finding.

The Verdict

As the professor mentioned, while coconut oil has antioxidants, the refining process doesn’t do much good for getting those antioxidants to you, the consumer, leaving olive oil the victor when it comes to antioxidant benefits.

Which is Better: Coconut Oil or Olive Oil?

To sum up, neither is “better” across the board. Coconut oil and olive oil have a lot in common, when it comes to skin care benefits.

If you’re looking for specific benefits, however, there are a few key differences to note.

Olive oil has more antioxidants than coconut oil.

Coconut oil has more antimicrobial properties, making it a better choice for fighting funguses and infections.

As coconut oil feels heavier than olive oil, some may feel it’s too strong for the face. Others will love the rich feel. In the end, it comes down to preference.

How to Apply Coconut Oil to the Skin

To get all the benefits of coconut oil, you’ll need the good stuff. Start with a 100% pure, unrefined, organic coconut oil.

As coconut oil is occlusive, it will keep your other products from seeping into the skin. Be sure to apply it as the last step to your regimen (beneath sunscreen during the day, of course!)

For best results, apply when skin is wet and avoid applying alongside essential oils.

Coconut oil hardens at room temperature, so massage it in your hands until it liquifies and then apply wherever you need it.

Use coconut oil as a makeup remover to remove waxy products like waterproof mascara and eyeliner.

Too much coconut oil can cause clogged pores because of the total fat, depending on your skin type. Starting with a thin layer is best.

How to Apply Olive Oil to the Skin

Ideally, start with an organic, non-GMO extra virgin olive oil (EVOO). This olive oil contains the highest concentration of antioxidants and vitamins like vitamin E, and uses no preservatives.

As olive oil is an occlusive moisturizer, sealing in moisture, it should be applied at the end of your skin care regimen after using cleansers, serums, and even moisturizers. (By day, it should be your last product before sunscreen!)

You might choose to mix your olive oil with another moisturizer. As always, apply right out of the shower or bath, when your skin is still a little wet.

Try using olive oil as a makeup remover to remove waxy products.

Don’t overdo it! A thin layer works wonders. Too much can cause clogged pores, especially for acne-prone skin or already oily skin conditions.

Herbal Healing, Skin, Wounds & First Aid

Apply Herbal Salve Pack to the Feet

Dara Dietz

Getting God’s great herbal Supports onto and into the sick area of the body is key to getting those areas healthy again. An Herbal Salve pack applied correctly can aid in bring healing to the injured or sick areas of the body. The trick is you have to apply the herbs in a way that will penetrate and also saturate the affected area.

The feet are a great place to begin learning how to best apply the salve packs. Jenivee and I did a couple videos while she was visiting this past week. Here is one on applying Salve packs to the feet.

She had what looked like it might be ringworm on the back of one heel. the black walnut salve took care of that issue in a couple of days. She had been rubbing a bit of the black walnut salve over the area and then putting on her socks this light application of even this powerful herb was unable to clear the issue. After applying a generous pack of the black walnut to her ankle overnight the issue was nearly gone.

Testimonials

Over the past few years the following paste has been used successfully to clear toenail fungus. The first time this suggestion was given I got a phone call about a year later. The woman shared she had followed the procedure for about three months, until she felt the fungus condition was cleared from her toenails. Her case had been very bad, the nails had all but rotted off. She shared that all her nails were dyed black and that the dye did not clear until the nails grew out. She said that as the nails grew out they were perfect, “like when I was a teenager”, she shared. It had taken her a year for the old nails to be replaced with the perfect new ones. Below are the suggestions I shared with her.

Toe Nail Fungus Paste

Here are the combining and usage instructions.

These are general instructions so you can use more for larger amounts or less if not so much paste is needed.

Combine the following in a small bowel

 2 parts slipper Elm

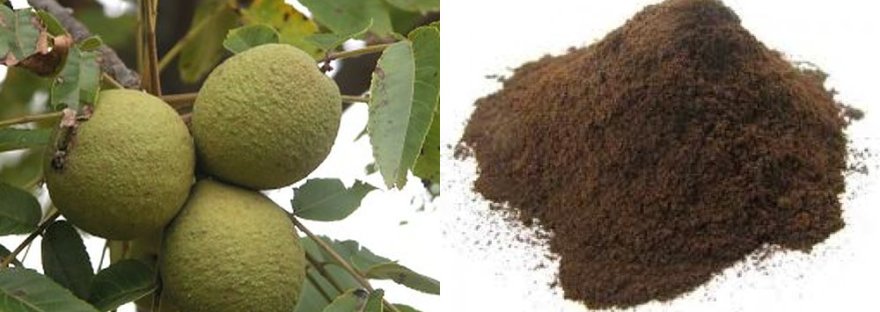
 1 part Black walnut powder

 1 tablespoon Black Walnut extract for each 3 table spoons of powder used

 Add Enough distilled water to make a paste

My suggestions is to do a tablespoon per part, this will make only a small amount at a time that can be easily used up in a few days. Store unused portion in cool place (fridge) for up to 5 days

Application:

For serious fungus issue: Dip cotton ball in Black Walnut extract and fasten over toe nail area. Leave in place for a few hours to allow the extract to saturate the affected area. When cotton ball has been removed apply paste as directed below.

Apply paste over affected toenails; cover with gauge to hold in place. Dress with socks for overnight sleeping. IF also able to apply during the day you may want to wear socks and sandals to keep paste in place while moving around.

Continue this procedure for 3 or 4 months. The fungus will be cleared from the area but the toenail can take up to a year to regrow. Those needing to apply the black walnut extract on a cotton ball will likely find the toe nail has been dyed black. As the toenail grows in healthy the black will be replaced with a healthy pink nail.

HEAL Classes, Herbal Healing, Skin, Wounds & First Aid

Skin Care Class

Dara Dietz

In our class this week we are going to discuss the Skin, how to care for and heal the different issues that can affect the skin.  The Skin is our third Lung, the body breaths in air and detoxes waste though the pores of the skin.  Consider your skin pores as thousands of little mouths breathing in the environment surrounding your body.  Wearing natural fiber material allows the skin to continue to breath beneath our clothes.  Material that prohibits the free circulation of air prevents the body from properly expelling toxins throughout the day. 

When the skin is overused as we see in cases of Hives, and Eczema, the need arises to clear the liver, our internal vacuum cleaner.  When the system becomes backed-up with waste, the bowels are not moving well is often the case, the liver will use the skin to detox.  The skin breaks down quicky under the onslaught of such toxic waste causing hives and eczema to appear.

Our class discussion will begin with the best first aid for cuts and scrapes.  How to prevent scaring of the skin.  How best to clear the blood of toxins which contribute to the toxic conditions of Abscesses, Boils, and Cysts.  How to regain and or, maintain the elasticity in your skin which will clear or prevent Varicose Veins.  We will be looking into the cause and how to clear most issues that affect our skin.  Come and Join the discussion for a better understanding of how to best care for the skin you are in.

Here is a short list of Skin affecting issues we will be looking at in our class: Cuts,& Scrapes; Spider Bites, Poison Ivy & Oak, Abscesses, Boils, Cysts; Hives & Eczema; Shingles, Warts, Moles, Itch, Scares, Sunburn, Burns; Skin Cancer; Varicose Veins.

Our Zoom Class meets every other Tuesday at 6:30 PM EST. An email notice will be sent to our members Tuesday Morning with the Class link. We look forward to seeing any who are able to come.

Skin Care Class

Handouts: There is a list of files for this class.

Herbal Healing, Skin, Wounds & First Aid

Brown Recluse Spider Bite

Dara Dietz

One of our wonderful members recently experienced a Brown Recluse Spider Bite.  Here is the protocol we suggested and what was done to clear the issue at home using the simple natural herbal remedies

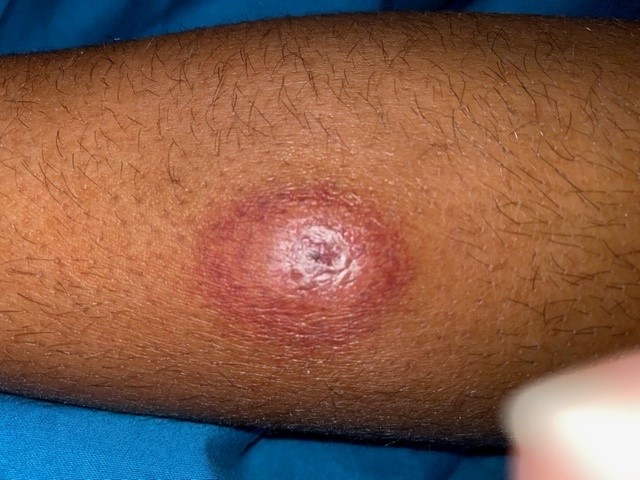
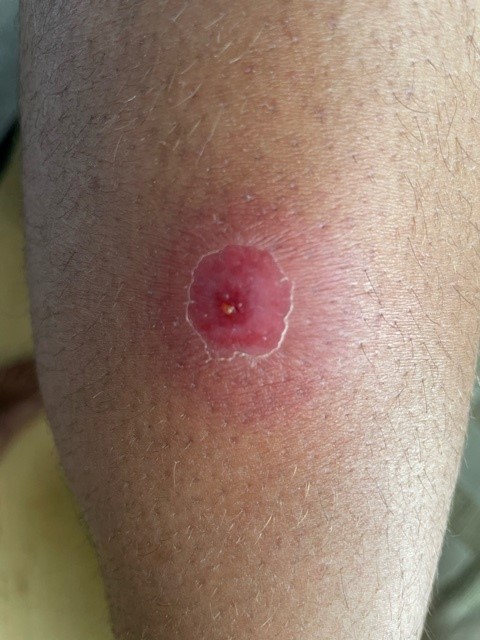
Brown recluse spider bites are usually painless therefore often initially go unnoticed.  Symptoms usually develop 2-8 hours after a bite. The actual bite will cause little tissue destruction.

Initially the bite site is mildly red and upon close inspection may reveal fang marks. Within a few hours, the redness gives way to pallor with a red ring surrounding the area, or a “bull’s-eye” appearance. The lesion will often appear to flow downhill over the course of many hours. The center area will then often blister, which over 12-48 hours can sink, turning bluish then black as this area of tissue dies.

Brown Recluse Spider Bite

As soon as you notice you have been bit apply a generous amount of Infection Salve over the bite area.  Spread it out in all directions for several inches if possible.  Cover with cotton flannel if possible.

By the time our member noticed the bite the pressure had already built to the place of pain.  He decided to lance the bite.  He admitted all he got out at this point was blood.  No puss was released by this early cut.

As soon as you can assemble the items make the Charcoal Flax Seed Poultice.  The poultice needs to be large enough to completely encase the affected area. As example would be, If the bite is on the calf, encase the entire calf in the poultice.  You may also want to apply some M&L salve over the area before applying the poultice.  This will aid in opening the lymph system to move waste more effectively from the area. 

Here is how our member effectively cleared the serious and painful effects of the Brown Recluse Spider Bite.

That first night after lancing the bite to try to release some of the pressure he applied the charcoal Flax poultice.

The next morning after we spoke he began using the Infection Salve alternating between the Charcoal Poultice and infection salve.  Leave the Charcoal Poultice on at least 4 hours before changing back to the Infection salve pack for 4 hours. 

He also began the Infection Program using the Herbal Antibiotic, Infection formula and Echinacea.  Using 1 oz of Echinacea daily and one tsp of the Herbal antibiotic or Infection Formula every 2 hours.  It was decided switching between the two formulas every other dose would be a good idea.  See more information on the Infection Program in the Infection Info Sheet.

After work he decided to do a Hot Epsom Salt bath.  While in the bath the bite site erupted.  The Puss that came out looked like Cottage Cheese.

Spider Bite after Epsom Salt bath

After the bath he applied an Infection Salve pack and did his ELF (Emergency Liver Flush)  See pdf for instructions and details.

He changed the Infection Poultice for another Charcoal Flax Poultice at bedtime and left it on all night.

The next day he continued the Infection program and kept the bite encased in the Charcoal Flax poultice or the infection salve throughout the day.

After work is did another Hot Epsom Salt bath.  More puss was ejected from the bite site, not as much as the day before.

Applied the infection Salve after the bath and then changed to the Charcoal poultice at bedtime. 

This was the Last charcoal Flax poultice needed. 

He continued to use the Infection salve as needed.  The spider bite was cleared in three days, healing the lance site took several days longer.

 Please note a garden variety spider bite will be quickly cleared, usually 24 hours by using the Infection Salve alone.  I received a bite several years ago and it took a little more than 24 hours to completely clear the red area from my finger.  There was a painful sting as soon as I received the bite.  If you have no idea what type of spider bite you have apply the infection salve first.  If the bite dose not continue to escalate in swelling and pain it is likely not a Recluse bite and will clear with out much more drama. 

Herbal Healing, Pain, Joints & Injuries, Skin, Wounds & First Aid

BF&C Quickly Reverses Soft Tissue Injury

Last Wednesday I tripped over the edge of the carpet directly outside my office and fell flat.  My left arm caught the worst of the damage.  Thank the Lord for BF&C Salve and extract.  My arm, though not broken, was too damaged to use.  The elbow had been seriously jammed up.  The joint was immediately wrapped in a BF&C Pack and I began drinking a cup of the BF&C tea every hour.  It was immobilized by holding it tight across my abdomen.  That first day it was too painful to even move an inch in any direction.  The discomfort was coming directly from the elbow joint.  The M&L Salve used for its muscle relaxing properties was a helpful herbal tool for keeping the elbow from locking up. 

The BF&C Salve Pack was left on all day and all night.  Thursday Morning I was able to, (with a lot of discomfort) lift my arm enough to get dressed.  It has been a week since the fall and each day’s healing improvements have been noteworthy.  The BF&C formula continues to be one of the best and quickest ways to heal any soft tissue injury.  Often for a slight sprang or turned ankle the use of a pack will all but clear the issue overnight.   Remember when the worst happens the herbal gifts given us from the Father are still our quickest way out of pain and will also speed the healing process.

Herbal Healing, Skin, Wounds & First Aid

Clearing Boils Naturally

Infection Poultice

In most Cases clearing Boils is a two-step process.  Relieving the pain and pressure by pulling the boil from the body is only the first step.  The Use of Burdock Root to purify the blood along with a light to moderate infection program will prevent the boils from refilling.

You can view my video on making the poultice on youtube: Simple Drawing Infection Poultice Video

A good Simple program to clear boils:

Simple Drawing Infection Poultice
  • Use the Infection Poultice to pull and empty the boils. This will draw a boil to the surface even if it is deep in the tissue.  Normally the boil will open and drain overnight, relieving the pain and pressure.
  • Begin drinking one cup of Burdock Rt tea each day. Use 1 rounded teaspoon of the root added to 8 to 12 ounces boiling water. Allow to steep 15 minutes before drinking.  For a stronger tea add ½ tsp. Burdock Root extract to the boiling water along with the dried root.
  • Begin the light or moderate infection program: 1 oz Echinacea daily; 1 tsp infection formula every 2 or 3 hours. See Infection Info Sheet for details.
  • Remember to ensure your bowels are open and working well. It will do no good to use the herbs to clear the toxins from your blood if they are unable to be properly removed from the body.
  • Cut out all process foods, Sugar, White flour ect.. Your body needs support to do the cleansing work you are asking it to do.  When doing infection work it is good to add 16 to 32 ounces of carrot juice to your daily food program.
  • Drink!!! Flush your body with plenty of water or herbal teas. Try to get down a gallon each day to support the clean up you are doing.

Continue using the Burdock for 3 or 4 weeks after all symptoms have cleared.  Continue the infection program for 10 days. For serious cases both the infection work and burdock can be extended for 2 or 3 months or as long as needed to clear the issues from the body.

Herbal Healing, My Opinion, Skin, Wounds & First Aid

Wound Care

Ulcer-Leg-bandage

Successful treatment of difficult wounds requires an understanding of the entire person, not just the wound.  Life’s little boo boo’s can be serious injuries for people with poor circulation or one of any number of chronic diseases.  Over the years we have found several herbal supports which aid in quickly healing even the most stubborn wounds.

The Infection Salve has been renamed by many of our members as the “Healing Salve”.  The reason is how fast wounds heal when this salve is applied.  The slowest healing wounds disappear in days instead of weeks or months.  The herbs in this formula not only fight infection but also work to knit the skin and tissue back together.

Ensuring adequate oxygen and nutrition to the wound

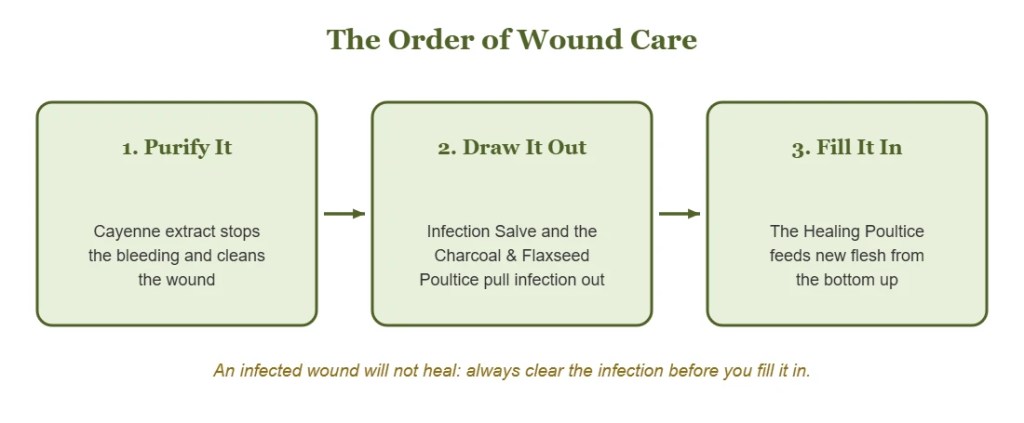
First Aid: The use of Cayenne topically right into the wound as soon as a break in the skin is detected will greatly speed healing.  Cayenne will instantly arrest (stop) even the worst bleeding while continuing to stimulate circulation in and around the wound.

Local constriction of the veins and vessels are the usual reason for lack of good oxygen to the wound.  Constriction can result because the affected area is kept too cold, driving the blood deeper into the tissue, away from the skin’s surface.  The nutrient rich blood is also unable to properly feed the affected area.

Bleeding Control: Anytime there is a break in the skin the first priority is to stop bleeding.  This is quickly done by flushing the wound with a liquid Cayenne extract or packing with a strong cayenne powder directly into the wound. Apply pressure until the bleeding as stopped.  Depending on the severity of the wound pressure need only be applied for a minute or two for the bleeding to cease.  Use as much cayenne as needed to control bleeding.

Simple Drawing Infection Poultice

Infection:  An infected or inflamed wound will not heal.  When dealing with old wounds of any kind that refuse to close and heal apply the “Infection Poultice” consisting of Charcoal and ground Flax seed to purify and clear any bacteria or infection.  Apply poultice as directed in the Infection Information sheet.  Normally one application will clear any issue allowing the wound to close and heal.

HPIM1251

Prevent infection by flushing any break in the skin with Cayenne and applying the Infection Salve under the bandage. Remember when using Cayenne to purify and stop bleeding use only cloth bandages or Band-Aids.  The natural fiber will allow the skin to breathe preventing the Cayenne from heating up the skin.  When the wound is covered with a plastic or suffocating fiber the cayenne will feel hot under the bandage.

Deep Wounds, or Gouges; once bleeding is under control make a paste using the “Healing Poultice” and water.  Fill the open wound with the Healing Poultice and cover with gauze or other natural fiber bandage.  The poultice will often harden forming an herbal protective scab over the wound.  The poultice material may or may not flush out when bathing.  If the material does flush out when bathing repack the area and recover as needed.  If the scab formed holds in place add more of the herbal poultice as needed to the top of the wound.  The body will absorb the herbal poultice mix into itself using these nutrients to grow new flesh as needed.  The wound will become shallower as the flesh fills in.  In many cases there is no scaring of the skin after the healing is completed.

Wound Care Bed Sores

Decubitus Ulcers:  Flush or Soak the affected area with Hot Cayenne Water.  This is made with ½ teaspoon Cayenne tincture to each Gallon of Hot Water used.  This will stimulate circulation into and around the wound.  After the soaking if the wound is deep pack it with the “Healing Poultice” and “Infection Salve”.  Each day soak the affected area in Hot Cayenne Water reapplying the “Healing Poultice” as needed.

When dealing with feet Ulcers the cayenne soak is a simple procedure.  Decubitus Ulcers on the back and bottom of the person are a bit harder to treat.  In the case of these soak a towel in the hot cayenne water and lay over the affected area changing as needed when application cools down.  Allow the hot towel application to continue for ½ hour before applying the Healing poultice and bandage.

Note: Using the Infection salve around and in the Ulcers speeds the healing.  It can be tricky getting the poultice to stay in the wound with the oily salve coating the area.  Only using the salve around the top of the ulcer is helpful.

Abrasion183x253.jpg

Abrasions & Scrapes:  Clean well using a good soap and flushing with water.  Dabbing the liquid Cayenne extract over the scrapes will speed healing and ease the skin’s discomfort.  Using the BF&C Salve or the Infection Salve will prevent infection and speed healing.

An Abrasion can cause serious issues particularly to the paper thin skin of the elderly.  Stop the bleeding with Cayenne and properly clean the wound as needed.  Apply the Infection Salve and bandage as needed.  In most cases the skin will heal in a day or two using this procedure.

Puncture wounds: Drip Cayenne directly into the wound this will not only stop the bleeding but will disinfect the wound.  Bandage with the infection Salve.  For deep wound infection use the Charcoal/Flax Seed Poultice (Infection Poultice) overnight then bandage as normal with the Infection Salve.