Our class this Tuesday Evening, June 7th, at 7PM Est, is going to be a discussion on Liver Flushing. Understanding why and when to flush the Liver is vital to any healing or cleansing program.
The class discussing will include a detailed plan to clear the bowels swiftly so the liver can be quickly flushed.
We will discuss the Liver Flush, the 5 day detoxing program, including the three levels, light, Moderate, and Intense, that can be done during the 5 day cleanse.
Dara Dietz
We will also discuss the ELF, Emergency Liver Flush, when and how to do this excellent healing aid. Understanding that the ELF in and of itself is not a detox only a way to clear the liver enabling this vital organ to do the job only the liver can do, vacuum the waste from the entire body. The ELF is an excellent tool to use anytime the system or liver becomes overtaxed with waste. Quickly clearing the waste from the liver will also swiftly clear or prevent the detoxing backlash that often affects the body during any healing or cleansing program.
I am looking forward to an excellent time of discussion and learning. As always we will end the class with an open Q&A.
Clearing the bowels is the crucial first step in any cleansing or healing program. If the bowels are not open and working well the body is unable to remove the waste created by the cleansing programs resulting in a backlash of symptoms known commonly as “A Healing Crisis”. The waste the body is attempting to clear is reabsorbed while setting in the backed up bowel. The result is any or all types of detoxing symptoms. A few common examples are:
Breaking out in hives: The liver when unable to clear waste properly through the bowel will try to remove the toxic waste through the skin. The skin being a very sensitive organ not able to deal with the putrid waste from the liver will break down quickly under the onslaught resulting in hives, eczema ect…
Depression: Toxic blood cycling in the brain can cause any number of issues, such as headaches, mood swings, and depression.
Elevated Blood Pressure: Often the result of the Kidneys needing to be cleared of sediment and puss can result in the blood pressure popping up or fluctuating for no apparent reason.
Blood sugar issues: Either Low Blood Sugar (Hypoglycemia) or High Blood Sugar (Diabetes) can be exacerbated when the body is unable to throw off the waste created from a good detox program.
Quickly Cleaning the Bowels
The Bowel Cleansing program needs to be established and can take several days to determine how many capsules are needed to produce regular bowel movements. The normal and best way to begin your bowel cleansing program is to take one LBF #1 Capsule the first day, then two capsules the second day, continue to increase by one capsule each day until you discover how many capsules your body needs to function properly.
Establishing the Bowel program is important and necessary but many people new to natural healing are in a crisis needing to do an Emergency Liver Flush, to clear the liver, quickly reducing uncomfortable or serious symptoms. Clearing the Liver cannot be done if the bowels are backed up.
Here are some suggestions for quicky clearing the bowels. These procedures do not take the place of the LBF #1 Capsules, continue using the LBF #1 capsules as you normally would to support bowel function. The suggestions below are for flushing the bowels to clear them of the waste they are currently holding enabling an ELF; Emergency liver flush to be done.
Three Suggestions to Quickly Clear the Bowels
Prune Juice Flush
Ascorbic Acid, Vitamin C Flush
Epsom’s Salt Flush (Amazing Liver Flush)
The Prune Juice Flush is best done first thing in the morning. The effects of the flush are usually finished by the late afternoon. This Flush when done properly will turn the bowels to liquid for 4 to 6 hours allowing the backed up waste to be flushed form the bowel. For detailed instructions click on the following PDF.
The Ascorbic Acid or Vitamin C Flush is also best done early in the morning. I have found this flush to be a more personalized procedure. The person will take 1 tsp of Ascorbic Acid powder every 15 minutes until the bowels begin to move. Some persons will respond in two or three doses others will need more than 10 teaspoons of the powder. The effects of this flush clear the old hard waste from the bowel and again the bowels will be turned to liquid for several hours. Click this link for detailed instructions.
Flushing TIP: Once you know how many Teaspoons of Vit C Powder you need to clear the bowels you can take them all in one dose. Example: I need to use 5 tsp. of Vit C Powder, since I know how many I need I add all five teaspoons to one large glass of water. The Flush works the same as when I take a tsp. every 15 minutes.
The Prune Juice Flush or Vitamin C Flush can be used any time the bowels are too tight. This is a common issue when doing a good detox. You use the regular number of LBF #1 Capsules but in the morning your bowels are not moving. The waste from the liver is very dense so when doing a heavy detox program it is not uncommon for the bowels to become a bit tight. If you decide to do your prune Juice or Vit C Flush you will still take the LBF #1 with your dinner as normal.
The Epsom’s Salt Flush is done as a part of the ELF, liver Flush. The Epsom’s Salts are used in the evening and again in the morning after the ELF. Click here for a PDF with details. This flush can only be done once every 6 to 8 Weeks. It is a very effective flush but must be respected. Repeating it too often can upset the electrolyte balance in the blood.
Contrast baths and other hydrotherapy treatments for health have been used for a number of centuries in the past. Most recently, Dr. John R. Christopher added herbs to make the process into a large tea for the entire body.
In addition to greatly stimulating the circulation in the body, the Cold Sheet Treatment primarily creates an artificial fever–Dr. Christopher called it an “incubation.” This is beneficial because when the temperature of the body increases, the white blood cells move faster and faster through the body and engulf more and more bad stuff for elimination. If you could only do one thing within a very few hours, to show a very sick person that natural healing is very powerfully beneficial for them, you would always win doing a proper “Cold Sheet” on them.
Note: You don’t want to use municipal water containing chlorine, etc. If this is the water normally available for you at home, an inexpensive charcoal filter can be obtained from Home Depot type stores for about $30.00, which fits in place of your shower head.
Getting started you will need:
1 pair of large rubber gloves 4 ounces Ginger powder 4 ounces Cayenne Pepper Powder 4 ounces Mustard powder 1 bulb Fresh Garlic 1 bottle Cayenne Extract 1 bottle Lobelia Extract 4 ounces Peppermint tea leaves 4 ounces Fresh Ginger Root for tea 1 20 lb. bag of ice cubes
plastic to cover matress: 30 gal trash bags work well
3 extra cotton sheets that can be stained 2 extra very warm blankets 1 thin dishtowel or old white sock a bucket small bottle of apple cider vinegar gallon distilled water rectal bulb syringe large jar of Vaseline second person to help with these instructions
This description of the steps of the Cold Sheet Treatment is told as if you were the helper, assisting someone else to do the treatment, a man in this case so we can use the word “he” instead of “he/she.” When you are undergoing this treatment, the person helping you would do as per this description of steps.
Step ONE: Making the Tea
Take the 4 ounces of peppermint
4 ounces of fresh ginger root (chopped up) and make two to three quarts of tea
Do not let the tea boil, but rather simmer for 15 minutes or better.
Step TWO: Prepare the Bed
Prepare a bed by stripping off all of the bedding and covering the mattress entirely with spread out, large plastic bags or plastic mattress cover.
The idea is to protect the mattress from staining fluids.
Next make the bed with one 100% cotton sheet down and a second as a cover between the body and the first blanket.
Lay out a few blankets so that the person doing the Cold Sheet Treatment only needs to pop into bed.
Have a bucket with a sheet in the bottom of it filled with ice and water and placed near the tub.
The instructions are continued in our Hydro Therapy Pdf file below:
Hot & Cold: Practical advice on hot and cold showers
Why is hydro (water) therapy so important to do?
Whenever there is disease or injury there is blockage. The blood is not flowing freely through the affected area. It does no good loading your blood with healing nutrients if the blood cannot get through the blockage and deliver its load of nutrients and oxygen to the affected area.
Hot water brings fresh blood to the surface.
Then the cold forces it deep.
The more dramatic the change between Hot and Cold, the deeper and harder the blood is driven through the blockage.
Think of it as though you are firing a blood bullet through the blockage. The hot water loads the blood bullet and the cold fires it. The more dramatic the change between hot and cold the deeper and harder the bullet is fired.
How long do you recommend a person stay in hot and cold showers?
When someone is dealing with a terminal illness, it is suggested they take a forty-five minute shower three times a day.
How long hot? How long cold?
A couple of minute’s cold and five minutes hot, and a couple minute’s cold and five minutes hot. Do about seven repetitions of that.
There are several ways to do your HOTS & COLDS.
With a held held shower head apply hot and cold water, as hot as possible and as cold as you can get it, to the diseased area.
Take hot and cold showers. Stand under the flow of an over head shower and turn the knob to be as hot as you can handle, then all the way to cold.
An Ice Plunge is done as follows: Take a hot shower then jump in a bathtub of ice-cold water, or water with 20-40 pounds of ice in it.
The purpose of these techniques is not torture. It is to BLAST blood into sick areas that are not getting enough blood. Until you do that, expect to stay sick.
Simple Rules
For those who are frail, use common sense and start slowly.
For instance, on babies, use warm water and cool water. Obviously, be gentle.
If you have a heart condition, start gentle with warm and cool. You don’t want to shock the heart when it is weak.
To get the most result, work yourself up to using as hot as you can stand it — without burning your skin — and as cold as you can get it.
There are some hydro therapy procedures you can use on situations that commonly come up.
Ice Poultice for sore throat or swollen lymph glands in the neck area.
Foot soak in Hot and or Cold tubs for Neuropathy, Poor Circulation ect…
Cold Sheet Treatment for anyone doing the Incurables Program.
Mankind suffered greatly when the black plague struck Europe during the dark ages as well as the many times these types of flu or influenza have returned to the world, and we especially remember, with sadness, the great multitudes that died during the great flu epidemic of 1918 during World War I.
A fever is given to a person to assist in healing the body which has an over-case of toxicity which is causing a disease (lack of ease). Fever is like a fire, which can warm your body and save your life, or burn your house down and kill you. If the fever is properly controlled and skillfully handled it will clean the poisons, toxins and surplus mucus from the body and bring on a healing crisis. If not controlled properly the fever can kill the patient.
With the information we are presenting to you, at this time, many lives can be saved should another epidemic return.
Water therapy has been used for centuries to heal the sick. Rev. S. Kneipp, the great natural doctor of the old country, had published books on “water cures.” One in our library is a massive work on the subject. Many doctors and authors have volumes written on this subject, and why not? The body is made up of over 80% liquid. Much of the fluids in the body are toxic, loaded with cholesterol, mucus, etc., and with proper replacing, in a natural way, of good liquid we have a great key to better health.
An old story of the first written instances of the water cure is as follows:
Many years ago a peasant was heading home on foot, with miles to go. He was racked with fever, colds, and lumbago. While crossing a stream, over a log for a bridge, he slipped and fell into the icy cold water and was drenched to the skin. It was a bitterly cold day and the man had to walk home in the cold in sloppy wet clothes. By the time he had arrived home, his clothes were nearly dried out. The fevers and heat in his body had been raised, while hurrying miles home, to a point of healing climax and was down to nearly normal at the end of his journey. The lumbago and fever were gone and he rejoiced! The next time he got lumbago and fevers he knew the cure–he would return to the stream, fall in and walk home again.
We are going to explain a procedure that will do the job at home without “falling into the stream” and this is a life saver, when pneumonia, colds, flu and fevers hit. It is called:
Everyone under estimates the power of the cleansing programs. Failure to do the cleansing programs rigorously and repeatedly can cause you to not get well.
I’ve spoken with members who swore they were on the Incurables program, yet they only cleansed their liver once in a while, every few months. They did not seem to regard it as critical. It is.
The Liver Cleansing Routines support the liver in the work of healing your body. It does not matter what the disease or injury, if the liver is not actively doing the work of waste removal, you will not have a healing experience.
Everyone wants a “silver bullet”, they hope H.E.A.L. will provide them some herbal remedy in a bottle to reverse all the damage, heal their diseases and fix decades of unconscious living in a weekend. This just can’t be done. Anyone who claims they can do this is lying.
My Liver Cleansing Testimony
I began liver flushing when my knee failed to respond to any of the normal healing routines I had been doing. The fire-ball of pain in my knee sent me looking for answers. While researching in Dr. Christopher’s material I happened across this simple sentence, “nervine herbs can be helpful in cases of nerve pain.” That was all I needed to read. I secured a bottle of the General Nervine Tonic and quickly applied the liquid solution right on my knee. Instantly the flames of pain were quenched. The relief lasted nearly three hours before needing a reapplication.
Even though this proved to be the turning point in my healing a rapid return to health did not occur. I seemed to be settling into a chronic condition of knee pain. Some days I felt pretty good, but there was always the awareness that my knee was not healthy. This is not an acceptable way to live. I continued to do hot and cold on my knee, BF&C packs, anything I could think of to focus the healing powers of my body on this area. Nothing helped, for unknown reasons healing had stalled.
The time had come to get serious; when nothing is working it is time to liver flush.
The first week of flushing I noticed a huge relief. The amount of pain I felt dropped about 60%. I removed the stool I had been using to keep my knee stable from beneath my desk. I also stopped using ice packs, and begin strengthening the knee by exercising with light weights.
The next week I did a light kidney flush and raw food program. By Friday of that week I was hurting again, it seemed I’d regressed a bit.
Week three, Monday morning I began another week of liver flushing. By Thursday I knew I had made tremendous progress, I was practically pain free. I had been juice fasting since Sunday night.
Friday morning I decided to end my juice fast and have a favorite dish I’d been dreaming of all week. Except for the French bread the meal could be considered raw. To make a long story short, I crashed, big time. Friday night I was in a world of hurt, again. It was a horrible set back. I had broken an important rule for coming off a juice fast. There must be at least one day of eating raw before using cooked foods again. The bread was more than my system could handle.
The next week of liver flushing provided some relief but did not bring me back to the nearly pain free place I had experienced. It took two more weeks of liver flushing, an entire month, (each week of liver flushing must be followed by a week of kidney flushing) before I regained the pain free condition I had experienced at the end of my second week of serious liver flushing work.
I found liver flushing the only herbal therapy that would move my case forward. I’ve seen this in other cases I’ve advised on.
When nothing seems to work, do a liver flush. Cleansing the liver is always a good idea, when you are ill, injured or just emotionally down, do a liver flush. If you do not like the way your life is going, do a liver flush. Clean up the inside and the outside will take care of itself.
Our Zoom Class this week is going to deal with moving from the Foundational Programs into the detoxing, flushing programs.
Zoom Class meets every other Tuesday at: 6:30 PM EST
You may view our current class below.
Moving into the Flushing Programs Class
No matter what the issue everyone begins their healing or rebuilding program by first establishing the foundational programs of boosting the immune system with Echinacea, regulating the bowels with the Lower bowel formulas, and adding Superfood green drink to your daily food program.
Once the bowels are open and working well it is time to begin a week of liver flushing, followed by a week of Kidney flushing. This can prove a bit tricky when the bowels seem hard to regulate. How can you know your body is ready to begin liver flushing?
Incurables Program/ An Overview
We will discuss how to quickly clear the bowels for an Emergency Liver Flush.
What is the best food program to follow when flushing the body?
What to expect when adding the liver Flushing program.
It is always hard to do something new and different. When healing the body the more quickly one can move into the flushing programs the faster the healing will be. Clearing the liver is the heart of any healing program. Keeping the liver flushed will enable the liver to better filter the toxins from the body.
The second week of flushing will be Kidney flushing. This flushing program is much less intense than the Liver flush but still very important to the healing process.
Remember to write your questions down so you will remember what you wanted to ask. As always we will have an open Q&A time at the end of the class.
Vitamin C Flushing has been around for years. I’ve known of it but failed to take advantage of this simple healing tool until one of our sweet young members guided me through the process. I must admit to being very impressed with the results of this straightforward and effortless flush. Within hours the tired, toxic feeling plaguing me was gone.
After doing a bit more research and a few more of the flushes there are a few points that need to be addressed. Several cautions are floating around referring to excess Vitamin C creating kidney stones.
Clearly, the kidneys will be required to process additional waste from the blood due to the detoxing effect of the Vitamin C Flush. With this understanding it would be wise to do the Hot Lemonade drink at least once each day. This is an excellent aid for clearing puss and sediment form the kidneys.
I have also begun drinking between 32 and 64 ounces of the Kidney bladder tea each day. ( Add one ounce of the Kidney Bladder Formula into each finished gallon of tea.) I began using the tea in addition to the Hot lemonade drink when my kidneys begun to feel a bit sore after my first week of Vitamin C Flushing. The tea was consumed all day Saturday, by Sunday morning my kidneys felt right as rain.
Provide additional Kidney Support while doing this type of cleansing work with the Vitamin C.
Stay Well Hydrated
Use 1 oz Echinacea Daily
A Vitamin C flush is also known as an ascorbate flush or vitamin C cleanse. The concept is fairly simple and is based on the belief that high levels of vitamin C help rid the body of Toxins.
It just involves introducing high amounts of vitamin C at regular intervals until you produce a watery stool to carry toxins away from the body.
A vitamin C flush is one of the fastest working cleanses, so it’s best for those who are looking for rapid detox. It may also be used by those who are sick and looking for a quick recovery despite not responding to other methods of treatment. Any seemingly healthy adult can benefit from a vitamin C cleanse, but it is especially important for those who may be deficient.
The Benefits of a Vitamin C Flush
Vitamin C is an important nutrient for the body. It is most well-known for boosting the immune system, which is why it’s great for beating a cold. However, it does so much more than that.
ANTIOXIDANT – Vitamin C is a powerhouse antioxidant and boosts the function of other antioxidants as well, this helps to repair cells and slow the aging process of your cells to create younger-looking skin naturally.
HEALING – Wounds require collagen to heal completely. Vitamin C is a major player in the creation of collagen and without it, your wounds may not heal completely leading to abnormal tissue repair. A vitamin C boost can help your body repair itself and heal properly.
JOINT DAMAGE – Because of the effects that vitamin C has on collagen, some clinical trials have shown it is extremely helpful for joints. Vitamin C plays a major role in maintaining the integrity of connective tissue in the joints.
STRESS – Yes, Vitamin C can even help with your stress level. Cortisol is the body’s stress hormone and studies have shown Vitamin C can actually reduce this hormone in the body and combat the negative effects of stress.
A vitamin C flush gives the body a boost of vitamin C stores so that your body can use what it needs to leave you refreshed and energized.
Doing the Vitamin C Flush
A vitamin C flush is one of the simplest cleanses you can benefit from. Anyone can do it from the comfort of their own home. We recommend doing the vitamin C flush on a day when you’ll be comfortable and near a bathroom throughout the day.
STEPS:
In the morning: First thing in the morning, mix 1 tsp. vitamin C powder in 4 oz of water or fruit juice.
15 Minutes later: Repeat with another teaspoon of vitamin C in a 4 oz of water or fruit juice. Continue to repeat every 15 Minutes until you pass a watery stool. You may now stop taking the Vitamin C. The cleanse will now take care of itself.
This flush can be used in place of the Prune Juice Flush for clearing the bowels. The effects are the same. Your bowels will go to liquid for 4 to 6 hours.
Personal Testimony: My first time using this flush I feel I may have used more of the C powder than I really needed. I ended up using 10 doses. My bowels were very tight so after my bowels moved some solid waste I continued to take an additional two more doses. My last dose was at 12:30 Noon. My last water bowel movement was at 9pm that night. I had no cramping or discomfort of any kind just kept having watery stools every hour or so. to do my Vitamin C Flush without the bowel flushing I use 4 doses. This is good for me. You will need to discover how many you doses you require to hit bowel tolerance.
The best advice is once you have cleared your bowels, let’s say you needed 5 doses (1 tsp every 15 minutes five times), To do a Vitamin C Flush without the bowel Flush you will want to cut back to 4 doses of 1 teaspoon every 15 minutes. This should give you a good Vitamin C flush without turning your bowels to water.
Always remember to stay hydrated during this process by drinking plenty of fluids.
The member who guided me though my first Vitamin C Flush also suggested a brand of C powder. I have found it to be of excellent quality.
Revitalized Wellness: Fine Powder Vitamin C as Ascorbic Acid
Check out this pdf I found on line. I think it will provide a lot of insight into doing a good Vitamin C flush and show how to continue on allowing the C to heal the body. I do not have any experience of their product but did find their info very useful.
Liver Flushing at every level will be the topic of my Tuesday Night Class this week.
Join us in Zoom at 7 pm Est for an in-depth discussion of Liver Flushing.
This class will cover the three levels of liver flushing, which are the regular, moderate, and intense liver flushing programs. The importance of flushing the liver often and well when clearing any issue in the body or just detoxing to maintain health cannot be overstated. If you do not flush your liver your healing program will be awfully slow if it will work at all.
Liver Flush Zoom Class from Tue July 6th 2021
The liver is the organ responsible for reversing the toxic sick conditions in the body, it is the vacuum cleaner of the body, pulling waste, clearing blockages, removing disease from the system. When the liver becomes 70% toxic it will stop pulling waste and begin stashing waste around the body until it can be cleared (flushed). Think of a liver flush in this way, you are simply changing your internal vacuum cleaner bag. Flushing the waste out so the vacuum can pull more effectively.
For those new to detoxing and cleansing programs, getting into, and doing the work can be overwhelming. Today I want to take the time to lay out a good plan for the simple week of cleansing or the extended long term healing programs.
The “Incurables Kit”, can be divided into four parts:
Foundational items: Lower Bowel Formula #1; Lower bowel Formula #2, Superfood; Echinacea
Nutritional tonics Specific to the issue you are healing: The items here are the rebuilding tonic specific to the areas needing attention in your body. Examples would be: BF&C Formula; Female Formula; Prostate Formula; Heart Tonic; ect…
The First step when beginning any detox or healing program is to establish the Foundational programs. The most vital being the Bowel Cleansing aids. In most cases the bowels are not moving well, they are backed up, which will prevent the start up of any of the detoxing programs. Until the bowels are open and moving waste out effectively it is not wise or helpful to begin any detox program. That said, the first step in any healing or detoxing program is to ensure the bowels are open and moving well. The Lower Bowel Formula #l (LBF #1) needs to be established starting with the first day of your program.
Day one: Take one capsule with your dinner meal or around the dinner hour if you are on a juice fast. Increase by one capsule each day until your bowels are open and working well. It may take several days for you to find “your number” of capsules needed to support bowel function. Be patient with yourself, this is an important beginning, getting the bowel supports established well will prevent any number of detoxing issues from appearing as you are doing the Flushing Programs.
During the first week while you are discovering how many LBF #1 Capsules you need to use each day you will also want to begin the herbal supports to build up your immune system. Using an ounce of Echinacea 4 days each week (Monday-Thursday) is a great place to begin. When the stronger programs are done it may be needed to increase the Echinacea to an ounce each day for 6 days each week. Always rest from this formula one day each week.
The Nutritional Supports include your food program Which will depend on the extent of detoxing or healing you are doing. When setting up for a strong healing program or detoxing program it may be advantageous to juice fast for the first 30 days. This will aid the body in the detoxing, healing, processes by providing massive amounts of nutrition at cellular level. Flooding the body with the healing nutrients needed to clear whatever issues you are facing. For the best understanding of the benefits of juicing read the article: “Health through Nutrition”.
The Superfood Powder is a powerful nutritional supplement which can be used freely. The Suggested use while doing your healing programs is 2 tablespoons in juice three times a day. It is an excellent meal replacement when juice fasting. Superfood will provide the protein support needed when doing a raw food program or Juice fast. When the energy level droops later in the day a large dose (4 tablespoons) of Superfood will often revive the body in about 15 minutes.
Those using a Vegan or Vegetarian food program will find 2 tablespoons of Superfood taken once a day an excellent source of the B Vitamins that can be hard to come by for those who choose not to consume animal products.
Once the bowels are open and functioning well it is time to begin the Lower bowel formula #2 (LBF #2).
LBF #2 is taken 1 tsp every three hours throughout the day. This will usually come to five doses a day. ( I have found the hours of 3,6,9, 12; an easy way of staying on schedule when doing a formula that needs to be taken every three hours. This is only a suggestion, do what will work for you.
When using the LBF #2 the bowels will tighten up a bit so you will need to increase the LBF #1 by 1 or 2 capsules daily to accommodate the use of the LBF #2. This is the actual bowel detoxing formula. It works as a “Bowel Vacuum” drawing toxin from the bowel walls.
Remember with the Lower Bowel Formulas you are in control, if the bowels are too tight take an extra LBF #1 Capsule at dinner time. If the bowels are too loose drop a capsule from your daily dose.
Once the basic program are in place, the LBF #1 and the LBF #2 are established it is time to add the detoxing programs. I prefer to begin my Five Day Liver or Kidney detox on a Monday.
The five day Liver Detox is best done juice fasting. If this is not needed or possible a raw food program can be used. My day begins early with my juicer humming as I make my drinks for the day. Once all my fruits and veggies have been made into the great juice I will drink throughout the day it is time to do my first liver flush for the day. I suggest doing three each day during the five day flush week. See the schedule in our Liver flushing E-book for details.
The Five day Kidney Detox can be done best with a juice fast but the raw food program will work also. Again you will make you daily juices for each day first thing in the morning. Follow by your first Kidney flush of the day. See the Kidney Flushing E-Book for detail instructions.
By Breanne Fariss, written for the benefit of the H.E.A.L. members, with notes from Dara at the end.
You are what you eat, drink, breathe, and think… AND what you don’t eliminate!
If this is your first time, the idea of an enema may make you feel really uneasy and awkward, and rightfully so. You also may not be confident in the purpose of it. Truth is, it may not be something you would choose to do at a day at the spa, BUT you may feel just as good when you’re done! At first it will be awkward, but it will become more natural and easier in a very short time. It’s only water… give it a try!
An enema washes the colon (large intestine) from the inside. The general American diet is made of highly processed foods that do not promote colon health. They become sticky and thick, line the colon walls, and slow the healthy wave-like contractions (peristalsis) that move waste along. Excess mucus thickens the waste and makes it move through sluggishly.
Constipation. If you are not going daily (ideally as many times as you eat a meal), it’s time to make some changes. Think of the bulk of food you eat in a day: about that much should leave your body. Your body is a juicer, and it spits out the fiber. Enemas help get things moving while you also drink more water, change your diet, add fiber and probiotics, and use the Lower Bowel Formula until you are going frequently and thoroughly.
Stomach aches and gas cramps. These are often caused by some level of constipation, a reaction to food, or the colon breaking loose old fecal matter, mucus and toxins during a cleanse. A series of enemas can give almost immediate relief.
Headaches. Depending on the cause, a series of enemas can help by releasing pent-up toxins and hydrating the bowel.
During a cleanse. When you give the body an opportunity to purge, it brings toxins up out of the places where it had them buried. If you don’t move them out quickly, they can be absorbed back through the colon wall and make you feel sick. Regular enemas keep the toxins moving out quickly and safely. Building the immune system with Echinacea is a great help at the same time. If anyone is doing any type of cleanse, they must be willing to do enemas.
Two Kinds of Enema
A regular enema only cleans out the rectum. These are the small Fleet-sized enemas you can buy. A high enema washes the whole length of the large intestine, sometimes with something added to the water for stimulation or a deeper cleanse. For your first few, use only warm, pure water.
Getting Ready
What to Buy
An enema bag system. These are often sold as a combination enema and douche kit; the bag is the same, only the nozzle differs. You will also need a lubricant. Natural oils such as pure olive oil or a water-soluble lubricant work. If you will be doing enemas daily, use BF&C Salve as your lubricant to protect the skin around the rectum.
Preparing Your Equipment
Clamp the tube. The bag comes with a clamp that fits over the tube near the nozzle. Clamp it shut before filling, or you will have a mess.
Fill with warm distilled water, about body temperature (95 to 100°F); test it on your wrist. Too hot and you cannot hold it and it is uncomfortable coming out. Too cold and the rectum will close up and won’t accept the water. Use the purest water you can, distilled is best, because you will absorb some of it through the colon.
Hang it up about 3 to 4 feet above the floor, where you can reach the tube easily while lying flat. A doorknob or towel rack is usually about right. The higher the bag, the stronger the flow. A permanent hook on the bathroom wall makes this easy; leave the rinsed bag hanging there, covered with a towel.
Clear the air from the tube. Hold the nozzle over the toilet, open the clamp for a couple of seconds until the air is out (you can hear it clear), then clamp it shut again.
Prepare your spot. Lay a towel on the floor where you will lie. If getting up and down from the floor is hard because of back trouble or other difficulty, you can kneel, or even sit on the toilet; just hang the bag higher and keep the hose from kinking.
Lubricate the nozzle and yourself so it goes in easily.
Prepare Yourself
Relax and breathe! Play some music, read your Bible or a book, or take advantage of some quiet time to think and pray.
What to expect. You will feel the water entering the colon and a slowly building pressure, perhaps some cramping. That means the water has met fecal matter or a gas bubble. Clamp the tube, relax, move side to side a little and massage, and it will often move along so more water can go in. If the pressure is too much, leave it clamped, remove the nozzle, release on the toilet, then go back and take the next bag. It is usually easier the second time, and easier still after a few days. It is not uncommon for only water to come back the first time or two; after a couple, you should start to see water mixed with fecal matter as things loosen.
Taking the High Enema
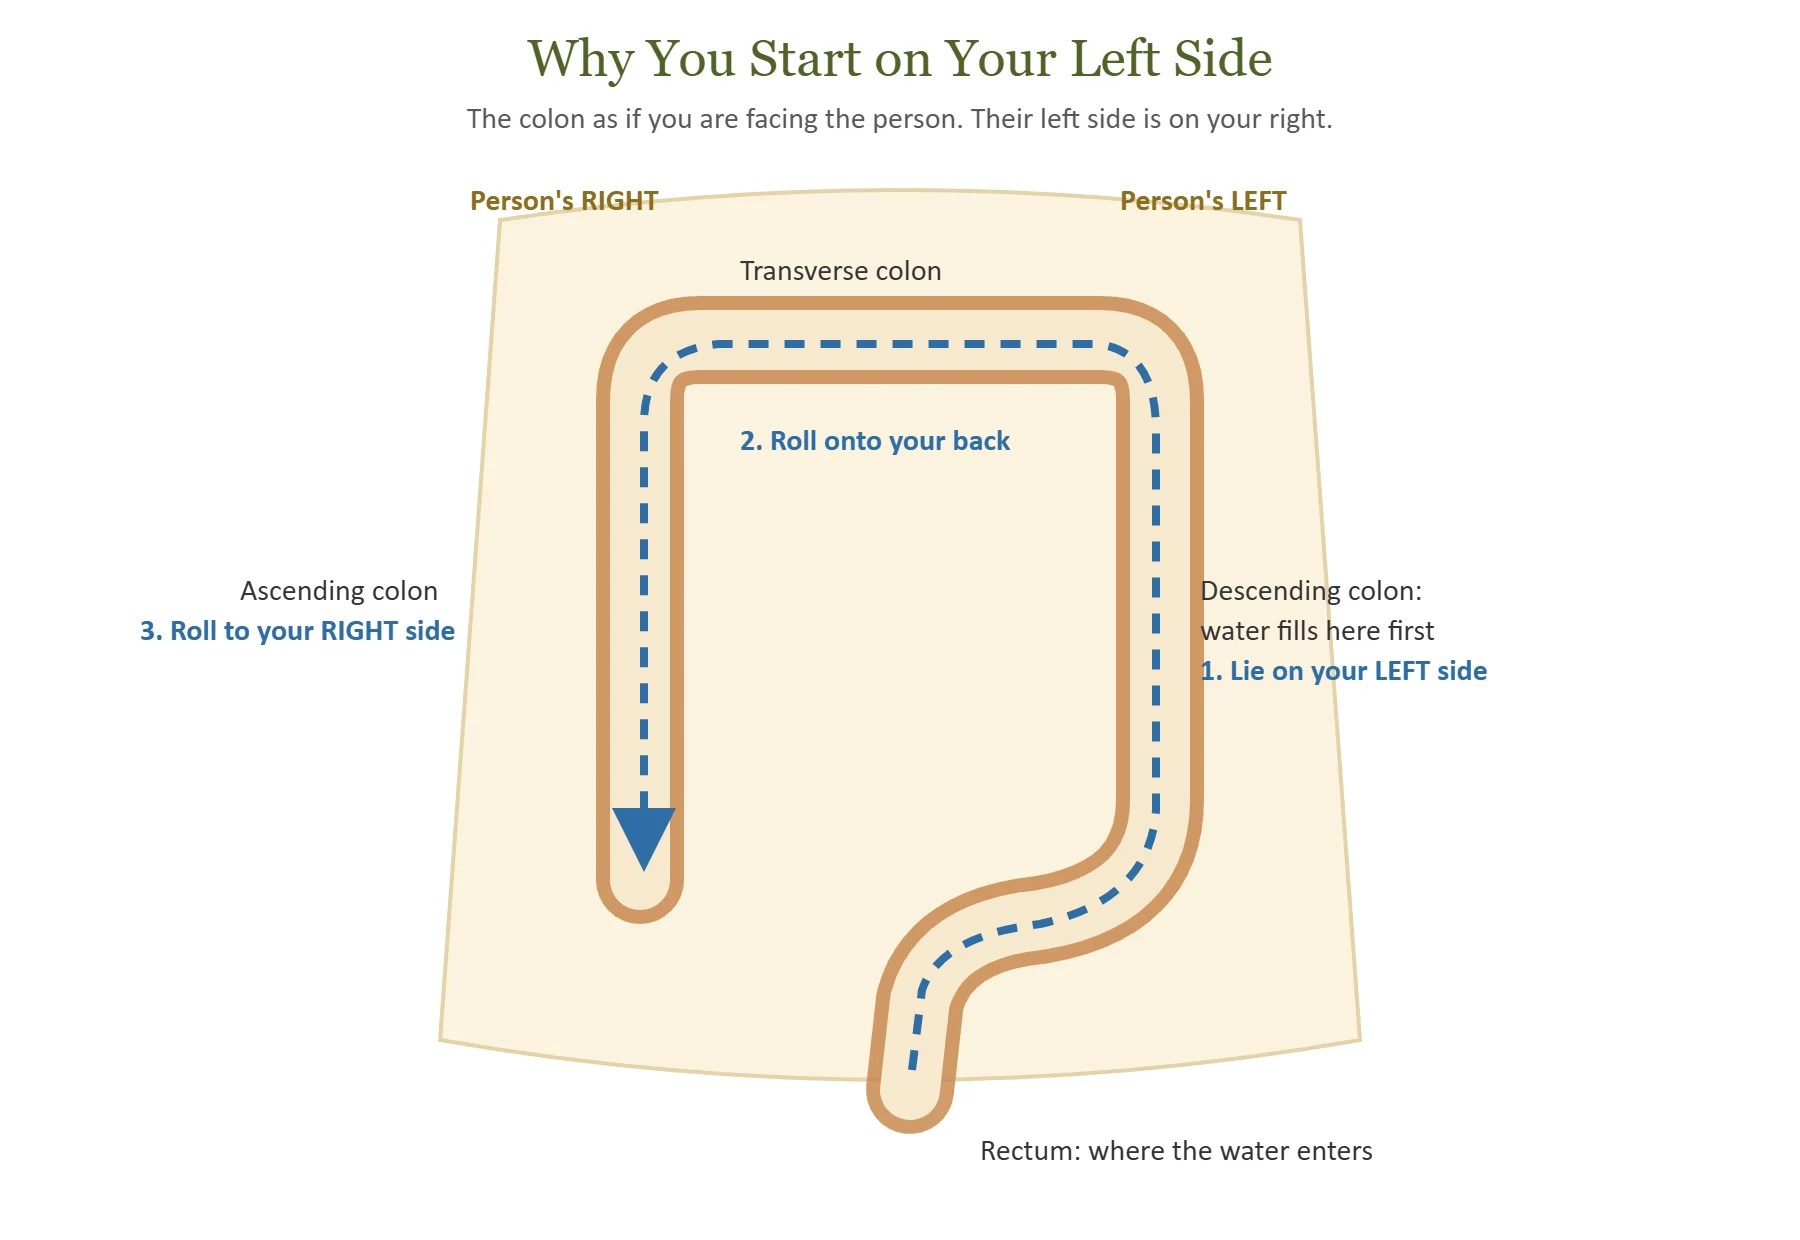
The water enters the rectum and fills the descending colon on your left side first, then crosses under the ribs and goes down the ascending colon on your right. Simplified diagram drawn for H.E.A.L.
1. Start on your LEFT side. Always begin an enema lying on your left side. From the rectum the colon runs up your left side, crosses your body under the ribs, and comes down your right side to where the small intestine joins it. Starting on the left lets the water flow along that path.
2. Insert gently. Slide the nozzle straight in, usually an inch or two (the kit’s instructions will say).
3. Let the water flow. Open the clamp. If it doesn’t flow well, check the hose for kinks and adjust the nozzle so it isn’t pressed against the wall of the rectum.
4. Massage your abdomen gently but firmly as the water flows in. It helps break up and release waste and lets trapped air move.
5. Roll with it. When about a third of the bag is in, turn onto your back. After another third, turn onto your right side. By then the water has traveled through most of the colon. Sometimes you can add more warm water to the bag and continue until you feel full.
6. Wait. Learn to hold the water 10 to 15 minutes; it is washing the inside of a dirty tube. At first you may not be able to hold it that long. Your first few times, just go to the toilet when the urge is strong.
7. Move and slosh. While the water is in, roll from your left side to your back to your right side, or lie on your back, raise your hips and slosh. When you stand to go, sway your belly side to side and around. The more the water sloshes, the more sludge breaks loose. Beware of sudden urges!
8. Release. When the urge is strong or your 10 to 15 minutes are up, sit on the toilet and release. A second or third urge may follow as more water and waste work their way out. Massage the colon in a clockwise circle to help. If a gas bubble causes a sharp cramp, bend over and keep massaging until it passes.
9. Repeat. Do the enema three times at each session for a thorough cleansing.
10. Clean up. Scrub the toilet right away, before old matter dries on like cement. Empty the bag, wash the nozzle well with hot soapy water, and hang it all to dry.
Great work! You have done a great service to your body, aiding it in its constant effort to keep you clean and healthy. Keep it up with pure food and water for a healthier, more energetic life.
Instructions by Breanne Fariss, written for the benefit of the H.E.A.L. members.
Dara’s Notes for the Healing Programs
How often. It depends on how well the bowels are working. Three times a week (every other day) is good. Once a day takes time, but it has its benefits: done first thing in the morning, it clears the bowels so you will likely not need to go again until the afternoon. If you do it daily, use BF&C Salve as the lubricant.
Cleansing tea for the enema water. On the Incurables Program, a tea of equal parts chaparral, Oregon grape root and red clover in distilled water makes a good cleansing high enema.
Follow with an implant. After the high enema, put in a small amount to be held and absorbed. Soothing: 8 ounces of aloe vera gel with 8 ounces of distilled water. Detoxifying: 2 ounces of wheatgrass juice with 16 ounces of distilled water. Anti-bacterial, anti-viral and anti-fungal: 1 to 2 cloves of garlic blended into 8 ounces of raw apple cider vinegar and 8 ounces of distilled water; an excellent healing aid, but it can be very intense. Red clover tea for blood cleansing and Echinacea root tea for the immune system also make good implants.
The Skullcap and Catnip Liver Dump
A really good herbal mix for getting the liver to release. Put 1 rounded tablespoon of skullcap and 1 rounded tablespoon of catnip in a 32-ounce jar, fill it with boiling distilled water, set a saucer or loose lid on top, and leave it in the bathroom overnight. In the morning, strain it into your final enema bag of water: a small strainer that fits over the mouth of the enema bag works perfectly, or strain it into another glass first and then add it to the bag.
Hold it until the need to let it out is clear. It normally takes effect in 5 to 10 minutes, and the liver will release a good amount of toxic waste, so stay close to the bathroom. A wonderful way to start the day with a cleared-out liver.
I find it better than a coffee enema: it gets the liver to release without stressing the endocrine system with too much stimulation from the caffeine.
Use distilled water for all enemas, implants and teas.
When Not to Do an Enema
Don’t do an enema with severe or sudden belly pain, a fever with a hard, tender belly, rectal bleeding you can’t explain, or soon after bowel or rectal surgery without your doctor. If the bowels have not moved for several days and you are vomiting or the belly is swelling, get medical help. Stop if you feel faint or dizzy. For babies and young children, see Enema for an Infant or Young Child; they need much smaller amounts.